Having control over your WooCommerce order statuses can be a huge time saver and can help you avoid unnecessary confusion. In this tutorial we’ll show you how to use the free plugin WunderAutomation to get in total control.
There are multiple reason you might need this. For instance the Stripe payment gateway will put new orders to the “Processing” status (assuming you capture the payment directly). A store selling downloadable products might want to change this so that the order is changed to “Completed” right away, eliminating any manual steps to fulfil orders.
We’re going to use the following parts:
- WunderAutomation (free) – Our Swiss army knife automation plugin for WordPress.
- WooCommerce – Well, this is should be obvious
Step 1 – Installing the needed plugins
Actually, it’s just one plugin, WunderAutomation:
WunderAutomation installs like any other plugin from the WordPress repository. The easiest way is to go to the plugins section on our WordPress dashboard and click Add new. In the search box, type in “wunderautmation” and follow the usual steps. Searching for WunderAutomation you should see this:

Click “Install now”, wait for the download and then click “Activate”.
About Order triggers
Before we go ahead and do that, we’ll look a little bit closer at the different WooCommerce triggers we have available in WunderAutomation:
| Trigger | Description |
| Order Created | This trigger fires when an order is first created and is assigned an id. If the order was created via checkout, the order details are all there, but might be changed later by an administrator. If the order was created manually in the admin dashboard (by an administrator) the order is most likely still being edited when this trigger fires. Because of that, this trigger might be too early for some workflows. |
| Order pending | This trigger fires when an order status is changed to pending. |
| Order on hold | This trigger fires when an order status is changed to on-hold. |
| Order processing | This trigger fires when an order status is changed to Processing, meaning that payment is secured but before the order is marked as complete. Note that in some setups, i.e via the plugin ‘ WooCommerce Order Status Control’, order status may change directly from pending to completed which means that this trigger will never fire. If that is the case in your setup, consider using the trigger ‘Order Paid ‘ instead. |
| Order completed | This trigger fires when an order status is changed to completed. This normally happens after payment is secured and the store owner then manually sets the status from processing to completed. |
| Order cancelled | This trigger fires when an order status is cancelled and status is changed to cancelled |
| Order failed | This trigger fires when an order failed and the status is set to failed. |
| Order paid | This trigger fires when an order is paid, meaning that the actual order status is changed from a non paid status (new, on-hold, pending etc.) to a paid status (processing or completed). |
As you can see above there are many possible events that for your automation workflow to hook into the order process. Make sure you read about all of these in the product documentation to make sure you choose the one that suits your needs the best.
Step 2 – Creating workflows
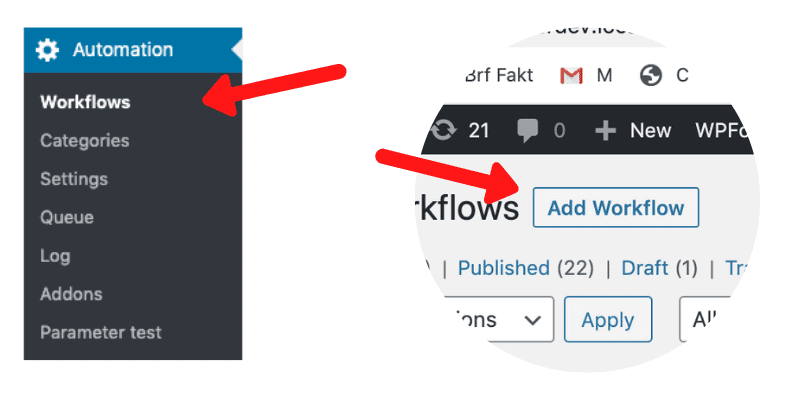
To create a new workflow, we’ll just go to the Automation menu, select Workflows and click Add Workflow to open up the workflow editor screen.

We’re going to start with a simple example of how we can automatically complete orders once they are paid. We’ll start with setting a name and select the trigger:
Trigger

We’re using the “Order completed” trigger. From the table above, we see that this triggers whenever an order status is moved to “Completed”.
Filters
To make this example slightly more interesting, we’re also gong to add filters. Firstly, we only want to automatically change the status if the order ONLY contains virtual products (that requires no shipping). We’re also going to require that this workflow only runs for orders created via the end user checkout. This means that any orders added manually via the admin will NOT get their status updated by this workflow.
The filters we create look like this:

Depending on your business requirements, you can add almost and additional rules you want here, the list of order specific filters you can apply to a workflow is quite long. Only for orders under a certain amount? Only for orders with a certain payment method? Go ahead and add any filters that suite your business:

Also worth mentioning, you can filter this behaviour based on more than just current order data, you also have access to meta data about the WordPress user (if the order is not placed by a guest), WordPress options, previous order count etc.
Actions
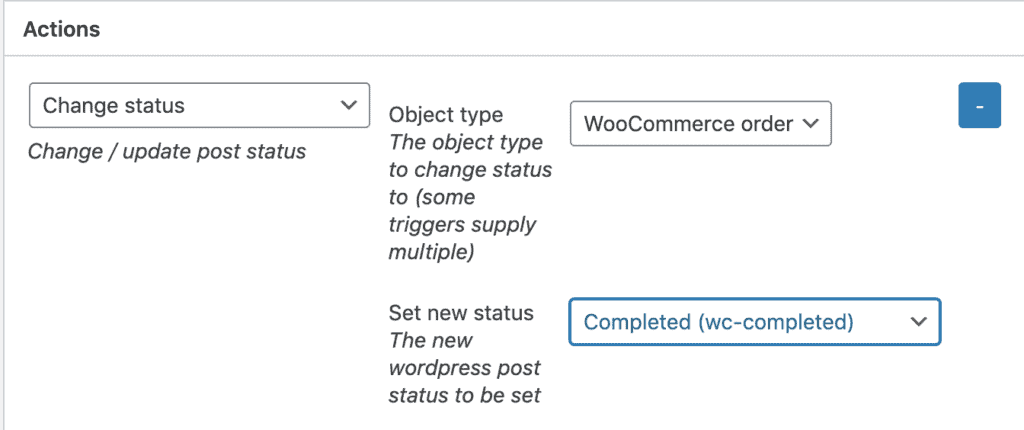
As with all workflows, the last and most important step is the actions. We’re going to add three actions here, the obvious one where we actually change the order status. And then a second one to flex the WunderAutomation muscles a little bit we’re going to add an order note and send a message to the site admin:
Action #1 – Change the status

This one should be fairly obvious. If the order passes the filters we set in the previous step we’ll just update the order status.
Action #2 – Add an order note

Adding an order note is fairly straight forward. This will be shown in the order note list with all other notes and contain a time stamp, acting like a log.
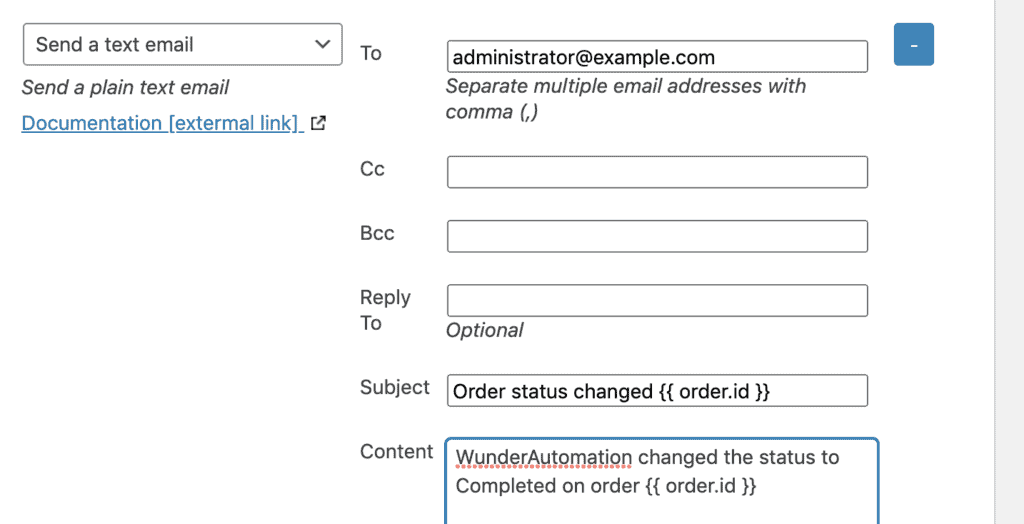
Action #3 – Send a message
This last action is probably not strictly needed in most of your own workflows, but in our experience it’s kind of nice to get a notification to out inboxes the first couple of times a workflow runs. Once you’re comfortable with how your workflow acts in real life, it’s easy to remove this last step.

Sending out a text email is just as straight forward as creating other WunderAutomation actions.
Now, email is very nice. But to make this last step even nicer, we actually often use Slack, SMS or Telegram messenger instead. To send out a message via any of those services you will need to get the correct add-on from our store.
-
 Telegram for WunderAutomationFrom: $59.00
 -
 Twilio for WunderAutomationFrom: $59.00
 -
 Slack for WunderAutomationFrom: $59.00
Endless combinatitons
In the two steps above we showed you how to automatically change order status under certain conditions. We’ve hopefully managed to show you that you have an extremely high degree of control of exactly when and how.
As you’ve probably already guessed, this is just a small taste of what kind of automations you can create in WordPress using WunderAutomation. Sending a custom email message to yourself is really just the tip of an iceberg. You can send webhooks to Zapier, IFTTT, Trello to just name a few ideas.
Questions, ideas, criticism? Let us know what you think in the comments below.
